After a very long research, I recently come across an awesome opensource alternative to Github Enterprise. There are many of them including GitLab, SCM-Manager, GitStack (Windows), etc. but installation was very difficult and time consuming.
Introducing GitBlit
It is an open-source, pure Java stack for managing, viewing, and serving Git repositories. Gitblit GO is an integrated, single-stack solution based on Jetty. It bundles all dependencies so that you can go from zero to Git in less than 5 mins. I’m not going to go into the installation stuff as its already given on their website. Download Gitblit Go and follow the instruction for installation.
Customizing Gitblit
A few things to check in case you want to customize the behavior of Gitblit server by modifying gitblit/data/gitblit.properties
// Base folder for repositories
git.repositoriesFolder = /var/www/github

// Use local IP to make it accessible within LAN
git.httpBindInterface = 172.18.11.178

// Listen to port
server.httpPort = 1337
You can write a small bash script, start.sh in order to avoid “java -jar gitblit.jar” every time you run the gitblit server.
#!/bin/bash
java -jar gitblit.jar
$ ./start.sh
INFO  ***********************************************************
INFO              _____  _  _    _      _  _  _
INFO             |  __ \(_)| |  | |    | |(_)| |
INFO             | |  \/ _ | |_ | |__  | | _ | |_
INFO             | | __ | || __|| '_ \ | || || __|
INFO             | |_\ \| || |_ | |_) || || || |_
INFO              \____/|_| \__||_.__/ |_||_| \__|
INFO                        Gitblit v1.3.0
INFO
INFO  ***********************************************************
INFO  Running on Linux (3.11.0-15-generic)
Open your browser to http://172.18.11.178:1337 depending on your chosen configuration and log in with admin/admin.
Creating Bare Repositories
Once logged in with admin, go to repositories and click new repository link. Enter repository name and description under General tab as shown below:

Then go to Access Permissions tab, add owners of the repository, change access restriction to “authenticated clone & push”, and tick allow authorized users to fork option – that means only authorized user can view/clone the repository and play with it. Finally give permission how users can interact with the repository. In this case, we give admin the RW+ (God) rights by clicking Add button. Lastly click Save to save the configuration. This will take you to a list of repositories screen where you’ll see our repo is listed showing admin as a owner.

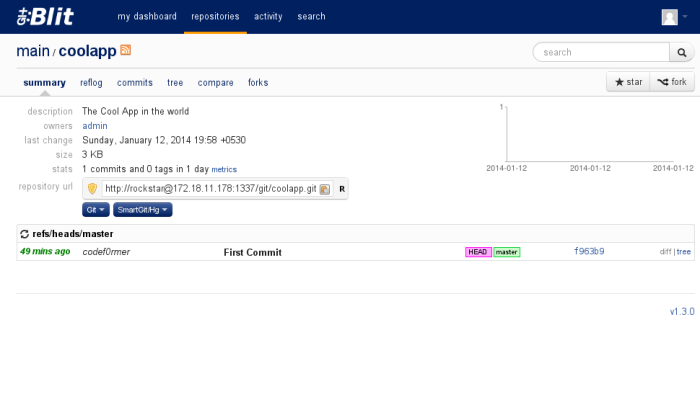
You will be presented with few instructions after selecting our repository (http://172.18.11.178:1337/summary/coolapp.git) from the list. Do not worry about whats shown on the page as we only care about the repo URL.

Importing the Project
If you are using git locally for your project then feel free to skip below steps. Fire up the terminal and run given commands:
- Create an application folder
- Add project files
- Create an empty git repository to watch over the project
- Stage all files
- Commit all staged files
$ mkdir coolapp && cd coolapp
$ touch index.html
$ git init
$ git add index.html
$ git commit -m "First Commit"
As we have set up a git repository on a local machine, we need to link it up with the remote repository we’d created previously.
- Add remote
- Check the remote added (you should see what you’d added here)
- Push local commits on the server (you’ve to enter the password for admin)
- Go back to our web interface and refresh the page
$ git remote add origin http://admin@172.18.11.178:1337/git/coolapp.git
$ git remote -v
$ git push -u origin master
You should see the commit message we just pushed.

Expanding the Team
Its very rare that only one person works on a project and we often have to give access of the repository to other developers so that they can contribute.
As you know, admin can create new users so lets have a look at how we can assign new member to the project.
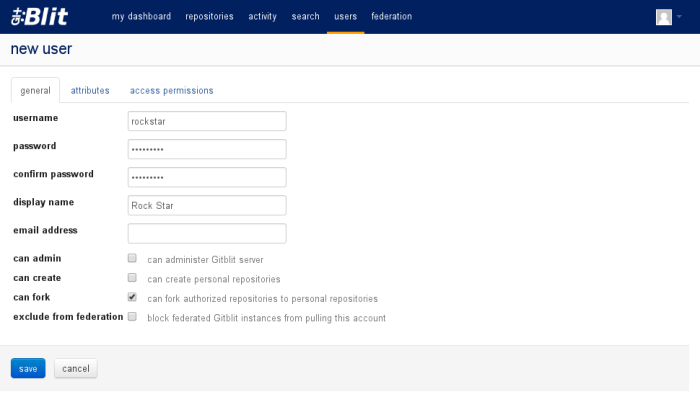
Go to users link on the top and click new user. Enter username and password. Allow him to fork the authorized repository. Finally select access permissions tab and provide appropriate repository permission. In this case, rockstar is only allowed to clone the coolapp repository which means he has to fork it in order to contribute. The single most benefit of the forking is that all the changes have to be scrutinized and validated before being landed into the main repository. Mostly a good option for Jr/Sr. developers.


Forking the repository
Once rockstar logs in, he will see all projects assigned to him. He can now choose the project and click “fork” button on the right.

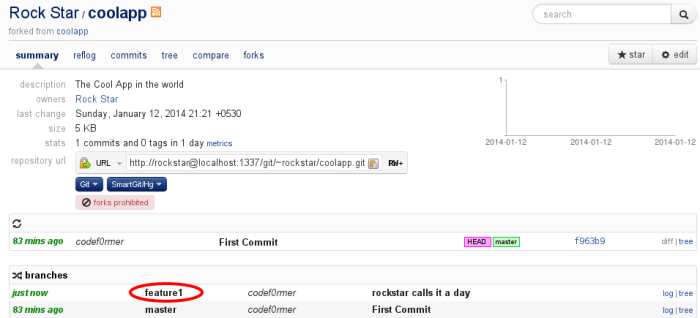
Post fork, you can see the url has been changed to `http://rockstar@172.18.11.178:1337/git/~rockstar/coolapp.git` that means a new forked repository has been created on the server for rockstar user.
Cloning the forked repository
We just have created fork of the coolapp for rockstar user but in order to work on the project, he has to clone it as coolapp-rockstar on his workstation. Run the following command in terminal:

$ git clone http://rockstar@172.18.11.178:1337/git/~rockstar/coolapp.git coolapp-rockstar
$ cd coolapp-rockstar
$ git remote -v
origin  http://rockstar@172.18.11.178:1337/git/~rockstar/coolapp.git (fetch)
origin  http://rockstar@172.18.11.178:1337/git/~rockstar/coolapp.git (push)
As you can see remote points to the forked repository on the server but there is no way to fetch updates from the main repository. So lets add and we’ll call it upstream. For that you have to go to repositories interface and select the main coolapp repository.


$ git remote add upstream http://rockstar@172.18.11.178:1337/git/coolapp.git
$ git remote -v
origin  http://rockstar@172.18.11.178:1337/git/~rockstar/coolapp.git (fetch)
origin  http://rockstar@172.18.11.178:1337/git/~rockstar/coolapp.git (push)
upstream        http://rockstar@172.18.11.178:1337/git/coolapp.git (fetch)
upstream        http://rockstar@172.18.11.178:1337/git/coolapp.git (push)
Now your local branch has been linked to the forked and the main repositories on the server. You can fetch and merge the updates from the main repository into your forked (local) repository using below commands.
$ git fetch upstream
$ git merge upstream/master
Its a best practice not to work on master branch directly, instead create a new branch for each task. This is how rockstar can contribute to coolapp:
$ git checkout -b feature1
$ git commit -m "rockstar calls it a day"
$ git push -u origin feature1
The last command is extremely important as he did not merge his changes into local master but has pushed the new branch on the server (into forked repository).

Sigh, Pull Request
Unfortunately, the github like pull request feature is not landed in Gitblit yet so meanwhile rockstar has to email the link of feature1 branch to the owner for code review and further validation. You can right click the highlighted feature1 branch and copy the URL to email.
If an admin/owner has any suggestions on the commit then he can revert on the email for the same and rockstar has to make necessary changes and update the branch. Provide -uf option to force push in case you amend the changes into the last commit.
$ git push -uf origin feature1
This way admin or owner can pull the feature1 branch and merge into the main repository for release.
Merging Pull Requests
Now admin/owner on the other hand have to pull the branch and merge it into the main repository if everything is okay. First thing you need to create a new branch (use the same name to avoid confusion) and pull the changes into it. In case rockstar’s feature1 branch is old than the main master branch then you can make it uptodate by rebasing so that his commit will appear on top.
$ git checkout -b feature1
$ git pull http://admin@172.18.11.178:1337/git/~rockstar/coolapp.git feature1
$ git rebase master
$ git checkout master
$ git merge feature1
$ git push origin master
Once rockstar’s commit is landed into the main repository, you can copy the URL of the commit and revert back on the same email thread to notify him about it.

Cleaning up the branches
Rockstar can delete both local/remote branches feature1 as soon as he received the acknowledgement from admin/owner about the merge. He can pull the updates in master branch and then get rid of feature1 local/remote branch.
$ git checkout master
$ git fetch upstream
$ git merge upstream/master
$ git branch -D feature1
$ git push -u origin :feature1
Good Night!