Fantastic Beasts: The Crimes of Pythonworld


When I decided to make my foray into the Pythonic World, I stumbled upon the sorcery between system level Python2.7 and Python3. What are pip and pip3? I used to install some Python packages using pip and if not worked, used pip3. Either of them always worked 🙅‍♂️. I did not know what I was doing apart from just getting the system up and running until I determined to see how deep the rabbit hole goes. But the rabbit hole was not that deep, it was my confused mind that made it deep until now…

pip vs pip3

As you have already guessed that Python3 is a predecessor of Python2. In order to maintain the backward compatibility of the package manager pip for Python2, Python3 came up with its own package manager under the name of pip3. However, we can point python and pip commands directly to python3 and pip3 executables respectively (which we will see in the later sections), so that we do not have to deal with python3 or pip3 commands while running a python script or installing any python package.

The upshot is that pip by default points to the system level Python 2.7 and pip3 points to whatever version we have for Python3.

⇒  pip --version
pip 19.0 from (python 2.7)
⇒  pip3 --version
pip 18.1 from (python 3.7)

To naively create an alias for python and pip commands to point to python3 and pip3, we can add following in our bash/zsh file and reload the shell to take its effect.

alias python=python3
alias pip=pip3
# BEFORE
⇒  python --version
Python 2.7.15
⇒  pip --version
pip 19.0 from (python 2.7)

# AFTER
source ~/.zshrc
⇒  python --version
Python 3.7.1
⇒  pip --version
pip 18.1 from (python 3.7)

This approach works, however, we constantly have to edit the bash/zsh file to switch between two or more versions of Python. Clearly, we can do better.

Introducing pyenv

Pyenv allows us to install and switch between multiple versions of Python.

pyenv versions

We can check what versions of Python are installed on our system with the following command. The * in the beginning represents the current Python version (System Python 2.7 in this case) the python and pip commands point to.

⇒  pyenv versions
* system
  3.6.3

pyenv install <version>

We can install any version of Python using the following install command. Note that the installation does not switch to the installed python version implicitly.

⇒  pyenv install 3.7.2
⇒  pyenv versions
* system
  3.6.3
  3.7.2

pyenv shell <version>

To manually switch to any Python version (only in the current shell), we can use this particular command. That means, killing the shell window would restore the Python version to the system level one. Here we have switched to Python 3.7.2 in the current shell.

⇒  pyenv shell 3.7.2
⇒  pyenv versions
  system
  3.6.3
* 3.7.2

Introducing pyenv-virtualenv

Now that we have fixed the problem of maintaining different versions of Python to be used in various Python Projects. The different but somewhat similar problem persists for Python packages too.

For example, imagine we have two Python projects running on top of Python 3.7.2 but using different versions of Django, 2.1.5 (latest) and 1.9. So installing both one after the other using pip install Django==2.1.5 and pip install Django==1.9 commands would override the 2.1.5 version with the 1.9 one. Hence, both projects inadvertently would end up using the same Django version which we do not want. That’s where Python Virtual Environments help.

There are many Python packages out there to manage our virtual environments and some of them are virtualenv, virtualenvwrapper, etc. Although, either is better or worse than others in some way. However, we are going to use pyenv-virtualenv which is a pyenv plugin using virtualenv under the hood.

pyenv virtualenvs

Similar to pyenv versions, this command shows us a list of virtual environments we have on our system. Below I have one virtualenv venv already created for Python 3.6.3.

⇒  pyenv virtualenvs
  3.6.3/envs/venv
  venv

pyenv virtualenv <environment-name>

Let’s create a virtual environment for Python 3.7.2. Now we can see the two virtual environments created but none of them are activated yet.

⇒  pyenv virtualenv venv-3.7.2
⇒  pyenv virtualenvs
  3.6.3/envs/venv
  3.7.2/envs/venv-3.7.2
  venv 
  venv-3.7.2 

pyenv activate <environment-name>

Let’s activate the virtual environment venv-3.7.2. The * in the beginning represents the activated virtual environment where Django will be installed.

⇒  pyenv activate venv-3.7.2
⇒  pyenv virtualenvs
  3.6.3/envs/venv 
  3.7.2/envs/venv-3.7.2 
  venv 
* venv-3.7.2 

First, we can confirm if Django is installed in the activated virtual environment. If not, we will install Django 1.9.

# BEFORE
⇒  pip list --format=columns
Package    Version
---------- -------
pip        19.0.1
setuptools 28.8.0

# AFTER
⇒  pip install Django==1.9
⇒  pip list --format=columns
Package    Version
---------- -------
Django     1.9
pip        19.0.1
setuptools 28.8.0

So far so good. Now we must verify whether we got the isolation for packages using pyenv-virtualenv that we wanted.

pyenv deactivate

To check that we can deactivate the current virtual environment. This command will restore Python to system level one. And pip list will now show all the global Python packages installed on our system. Notice that Django is not installed anymore since we got out of the venv-3.7.2 virtual environment.

⇒  pyenv deactivate
⇒  pyenv virtualenvs
  3.6.3/envs/venv 
  3.7.2/envs/venv-3.7.2 
  venv 
  venv-3.7.2 
⇒  pip list --format=columns
Package    Version
---------- -------
pip        9.0.1
setuptools 28.8.0
airbrake               2.1.0
aniso8601              4.1.0
arrow                  0.10.0
asn1crypto             0.24.0
attrs                  18.2.0
bcrypt                 3.1.6
bitarray               0.8.3
boto                   2.49.0
boto3                  1.9.83
.
.
.

Wrap up

As of now, pyenv and pyenv-virtualenv are serving me well. I hope that things will be stable going forward too. 🤟

If you found this article useful in anyway, feel free to donate me and receive my dilettante painting as a token of appreciation for your donation.

Managing CRON with Ansible


Setting up a CRON job manually is a child’s play so why am I writing about it? The reason I’m writing about it because of two main reasons:

  1. My experience of setting it up with Ansible
  2. Common mistakes I made which others can avoid

CRON

CRON daemon is a long-running process that executes commands at specific dates and times. This makes it easy to schedule activities like sending bulk emails. The CRON relies on a crontab file that has a list of scheduled commands to run. So we can manually add/edit/remove scheduled commands directly in the crontab file but this may induce bugs, especially when the list is too long. Ansible helps in deploying such CRON jobs effortlessly.

Ansible

Ansible is an IT automation and orchestration engine. It uses YAML file syntax for us to write such automation called Plays and the file itself is referred to as a Playbook. Playbooks contain Plays. Plays contain Tasks. And Tasks run pre-installed modules sequentially and trigger optional handlers.

Similarly, I have used a CRON module in Ansible to set up a task which configures a CRON job as follows:

- name: Run CRON job every day at 11.05 PM UTC
  become: yes
  become_method: sudo
  cron:
    name: "apache_restart"
    user: "root"
    hour: 23
    minute: 5
    job: "/bin/sh /usr/sbin/apache_restart.sh"
    state: present

Imagine there is a fictional CRON job to run Apache2 at the specified time every day – god knows why? But I made unfair mistakes initially while setting it up. Let us go step by step into each of those mistakes:

become and become_method

These flags are only necessary while running the job with sudo or any other privilege escalation method. In this case, I wanted to run /bin/sh /usr/sbin/apache_restart.sh command with sudo and I wished not to expect a password prompt that we usually get while running such commands manually. So the become flag prevents the password prompt.

In the beginning, I had forgotten to add these flags preventing the CRON job from executing the bash apache_restart.sh file as expected.

cron module

Ansible lets us use the pre-installed CRON module so that it will be far easy to setup CRON jobs. Although, by mistake, I had made CRON module an Ansible task as mentioned below.

- cron:
    name: "apache_restart"
    user: "root"
    hour: 23
    minute: 5
    job: "/bin/sh /usr/sbin/apache_restart.sh"
    state: present

As we learned before, only Tasks can run pre-installed modules. So Ansible instantly threw an error while deploying and I managed to save my face 🤦‍♂️

cron name

I thought that since I had already named the task, naming the CRON module will not be necessary. But I was embarrassed more than wrong. Because each time you deploy any changes to Ansible, without a CRON name, it will set up a new CRON job leaving the previous one as is. So I was literally restarting Apache2 thrice at a time. Remember, the CRON name works as a unique key to identify if any CRON job is already set up with the same name. If not, it will set up a brand new CRON job in the crontab file. Otherwise, override the existing one with new configurations.

state

The default state of the CRON job is present. Although to disable a particular CRON job, you change the state to absent and redeploy it via Ansible. I was using the state present without the CRON name that was creating multiple crontab entries on each deployment.

job

The job key takes the actual command that you want to run at a specific time/date. But make to use absolute command paths for brevity.

Wrap up

I also use tail -f /var/log/syslog and grep CRON /var/log/syslog commands to check the logs to make sure that CRON actually runs the bash file I specified.

If you found this article useful in anyway, feel free to donate me and receive my dilettante painting as a token of appreciation for your donation.

Setting up github like server locally using Gitblit


After a very long research, I recently come across an awesome opensource alternative to Github Enterprise. There are many of them including GitLab, SCM-Manager, GitStack (Windows), etc. but installation was very difficult and time consuming.

Introducing GitBlit

It is an open-source, pure Java stack for managing, viewing, and serving Git repositories. Gitblit GO is an integrated, single-stack solution based on Jetty. It bundles all dependencies so that you can go from zero to Git in less than 5 mins. I’m not going to go into the installation stuff as its already given on their website. Download Gitblit Go and follow the instruction for installation.

Customizing Gitblit

A few things to check in case you want to customize the behavior of Gitblit server by modifying gitblit/data/gitblit.properties

// Base folder for repositories
git.repositoriesFolder = /var/www/github

// Use local IP to make it accessible within LAN
git.httpBindInterface = 172.18.11.178

// Listen to port
server.httpPort = 1337

You can write a small bash script, start.sh in order to avoid “java -jar gitblit.jar” every time you run the gitblit server.

#!/bin/bash
java -jar gitblit.jar
$ ./start.sh
INFO  ***********************************************************
INFO              _____  _  _    _      _  _  _
INFO             |  __ \(_)| |  | |    | |(_)| |
INFO             | |  \/ _ | |_ | |__  | | _ | |_
INFO             | | __ | || __|| '_ \ | || || __|
INFO             | |_\ \| || |_ | |_) || || || |_
INFO              \____/|_| \__||_.__/ |_||_| \__|
INFO                        Gitblit v1.3.0
INFO  
INFO  ***********************************************************
INFO  Running on Linux (3.11.0-15-generic)

Open your browser to http://172.18.11.178:1337 depending on your chosen configuration and log in with admin/admin.

Creating Bare Repositories

Once logged in with admin, go to repositories and click new repository link. Enter repository name and description under General tab as shown below:

Creating Bare Repository

Then go to Access Permissions tab, add owners of the repository, change access restriction to “authenticated clone & push”, and tick allow authorized users to fork option – that means only authorized user can view/clone the repository and play with it. Finally give permission how users can interact with the repository. In this case, we give admin the RW+ (God) rights by clicking Add button. Lastly click Save to save the configuration. This will take you to a list of repositories screen where you’ll see our repo is listed showing admin as a owner.

Provide access to repository

You will be presented with few instructions after selecting our repository (http://172.18.11.178:1337/summary/coolapp.git) from the list. Do not worry about whats shown on the page as we only care about the repo URL.

Empty Repo
Empty Repo

Importing the Project

If you are using git locally for your project then feel free to skip below steps. Fire up the terminal and run given commands:

  1. Create an application folder
  2. Add project files
  3. Create an empty git repository to watch over the project
  4. Stage all files
  5. Commit all staged files
$ mkdir coolapp && cd coolapp
$ touch index.html
$ git init
$ git add index.html
$ git commit -m "First Commit"

As we have set up a git repository on a local machine, we need to link it up with the remote repository we’d created previously.

  1. Add remote
  2. Check the remote added (you should see what you’d added here)
  3. Push local commits on the server (you’ve to enter the password for admin)
  4. Go back to our web interface and refresh the page
$ git remote add origin http://admin@172.18.11.178:1337/git/coolapp.git
$ git remote -v
$ git push -u origin master

You should see the commit message we just pushed.

First Commit
First Commit

Expanding the Team

Its very rare that only one person works on a project and we often have to give access of the repository to other developers so that they can contribute.

As you know, admin can create new users so lets have a look at how we can assign new member to the project.
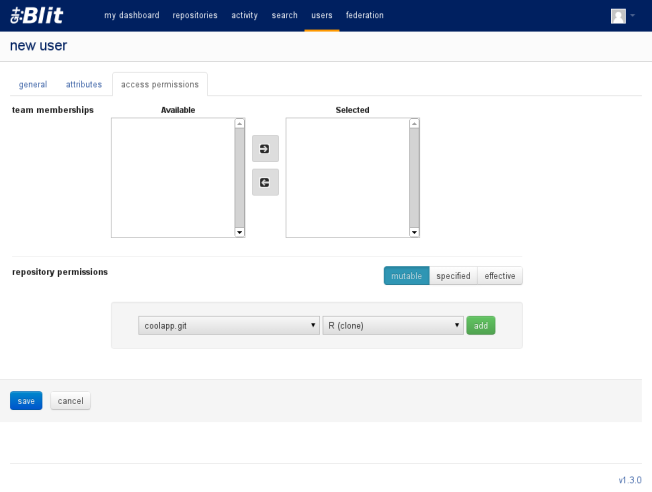
Go to users link on the top and click new user. Enter username and password. Allow him to fork the authorized repository. Finally select access permissions tab and provide appropriate repository permission. In this case, rockstar is only allowed to clone the coolapp repository which means he has to fork it in order to contribute. The single most benefit of the forking is that all the changes have to be scrutinized and validated before being landed into the main repository. Mostly a good option for Jr/Sr. developers.

New User
New User

New User Permissions

Forking the repository

Once rockstar logs in, he will see all projects assigned to him. He can now choose the project and click “fork” button on the right.

Fork a Repo
Fork a Repo

Post fork, you can see the url has been changed to `http://rockstar@172.18.11.178:1337/git/~rockstar/coolapp.git` that means a new forked repository has been created on the server for rockstar user.

Cloning the forked repository

We just have created fork of the coolapp for rockstar user but in order to work on the project, he has to clone it as coolapp-rockstar on his workstation. Run the following command in terminal:

Post Forking
Post Forking

$ git clone http://rockstar@172.18.11.178:1337/git/~rockstar/coolapp.git coolapp-rockstar
$ cd coolapp-rockstar
$ git remote -v
origin  http://rockstar@172.18.11.178:1337/git/~rockstar/coolapp.git (fetch)
origin  http://rockstar@172.18.11.178:1337/git/~rockstar/coolapp.git (push)

As you can see remote points to the forked repository on the server but there is no way to fetch updates from the main repository. So lets add and we’ll call it upstream. For that you have to go to repositories interface and select the main coolapp repository.

Clone Repo
Clone Repo

10-main-repo-rockstar

$ git remote add upstream http://rockstar@172.18.11.178:1337/git/coolapp.git
$ git remote -v
origin  http://rockstar@172.18.11.178:1337/git/~rockstar/coolapp.git (fetch)
origin  http://rockstar@172.18.11.178:1337/git/~rockstar/coolapp.git (push)
upstream        http://rockstar@172.18.11.178:1337/git/coolapp.git (fetch)
upstream        http://rockstar@172.18.11.178:1337/git/coolapp.git (push)

Now your local branch has been linked to the forked and the main repositories on the server. You can fetch and merge the updates from the main repository into your forked (local) repository using below commands.

$ git fetch upstream
$ git merge upstream/master

Its a best practice not to work on master branch directly, instead create a new branch for each task. This is how rockstar can contribute to coolapp:

$ git checkout -b feature1
$ git commit -m "rockstar calls it a day"
$ git push -u origin feature1

The last command is extremely important as he did not merge his changes into local master but has pushed the new branch on the server (into forked repository).

Rockstar Pushed
Rockstar Pushed

Sigh, Pull Request

Unfortunately, the github like pull request feature is not landed in Gitblit yet so meanwhile rockstar has to email the link of feature1 branch to the owner for code review and further validation. You can right click the highlighted feature1 branch and copy the URL to email.

If an admin/owner has any suggestions on the commit then he can revert on the email for the same and rockstar has to make necessary changes and update the branch. Provide -uf option to force push in case you amend the changes into the last commit.

$ git push -uf origin feature1

This way admin or owner can pull the feature1 branch and merge into the main repository for release.

Merging Pull Requests

Now admin/owner on the other hand have to pull the branch and merge it into the main repository if everything is okay. First thing you need to create a new branch (use the same name to avoid confusion) and pull the changes into it. In case rockstar’s feature1 branch is old than the main master branch then you can make it uptodate by rebasing so that his commit will appear on top.

$ git checkout -b feature1
$ git pull http://admin@172.18.11.178:1337/git/~rockstar/coolapp.git feature1
$ git rebase master
$ git checkout master
$ git merge feature1
$ git push origin master

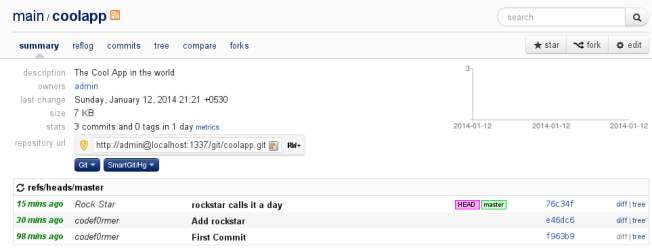
Once rockstar’s commit is landed into the main repository, you can copy the URL of the commit and revert back on the same email thread to notify him about it.
Rockstar's commit lands

Cleaning up the branches

Rockstar can delete both local/remote branches feature1 as soon as he received the acknowledgement from admin/owner about the merge. He can pull the updates in master branch and then get rid of feature1 local/remote branch.

$ git checkout master
$ git fetch upstream
$ git merge upstream/master
$ git branch -D feature1
$ git push -u origin :feature1

Good Night!

If you found this article useful in anyway, feel free to donate me and receive my dilettante painting as a token of appreciation for your donation.

How to find usb mounting point and serial number in bash


I’d been figuring out a way to find the mount points and their serial numbers for USB attached to the machine. So I decided to write a bash script which should return the details for multiple USB devices in a pipe (|) separated format.

/media/E4BC-1A90 :  2008012411263424  |  /media/Transcend : 0008012411263424
|________________|__________________|
mount point           Serial Number

Lets do it…

JFYI, There are many commands available in Linux to find all the mounted devices on your computer but the one we are going to use is ‘df’ which basically reports file system disk space usage. Here is what you get after running the command in Terminal.

amit@codef0rmer:/var/www/side-projects/usbsData$ df
Filesystem           1K-blocks      Used                 Available           Use%         Mounted on
/dev/sda1            49213248       18053208         28660100           39%            /
udev                   1001524         4                     1001520            1%              /dev
tmpfs                 404564            992                 403572              1%              /run
none                  5120               0                     5120                  0%             /run/lock
none                  1011404         2592                1008812             1%             /run/shm
/dev/sda6           185319436      38757044         137148660         23%            /home

/dev/sdb1           2058296          4                     2058292            1%             /media/E4BC-1A90

Now we’ll have to parse the output of the above command to extract only external devices mounted which IMO, mount into /media/ directory always, and store the locations into an array for further use.

# Fetching usbs location and putting them in array
locIterator="0"
locArr=()
while read row
do
   loc=$( echo $row | grep -P '/media/.*?$' -o )
   if [ "$loc" != "" ]; then
      locArr[ $locIterator ]="$loc"
      (( locIterator++ ))
   fi
done < <(df)

There are many commands to fetch the serial number and other details of the devices as well but I found this command suitable in this case. Here we are concatenating the content of multiple files generated after mounting the external devices using ‘cat /proc/scsi/usb-storage/*’ command.

# Fetching usbs serial numbers and putting them in array
snIterator="0"
snArr=()
while read row
do
   sn=$( echo $row | grep -P 'Serial Number:.*?$' -o )
   if [ "$sn" != "" ]; then
      snArr[ $snIterator ]="${sn:15}"
     (( snIterator++ ))
   fi
done < <(cat /proc/scsi/usb-storage/*)

Finally, we are going to loop through the first array and merge its elements with that of the second array, so we’ll get the desire output (see the starting of the blog post).

# Generating Output by looping through the both arrays
output=""
for (( i = 0 ; i < ${#locArr[@]} ; i++ ))
do
   if [ "$i" != "0"  ]; then 
      output="$output|"
   fi
   output="$output${locArr[$i]}: ${snArr[$i]}"
done
echo $output

Voila!

Run the script in a terminal `$ bash ./usb.sh`, please do not use `sh` instead of bash as you may get some belligerent errors 😉  and of course you can download the code from github.

Last but not the least, there are many ways to achieve the same thing and no program is 100% perfect so feel free to comment If you think we can make this bash script better. Good night! |-)

/media/E4BC-1A90: 2008012411263424
If you found this article useful in anyway, feel free to donate me and receive my dilettante painting as a token of appreciation for your donation.